Jira to Azure DevOps (VSTS or TFS) migration
Published December 17, 2018

CTO
Mathias Olausson

Looking for help migrating existing repositories to Azure DevOps?
Take a look at our Service Offer
In a previous post on Jira to VSTS migration, Damir Petrac explained how to approach the challenge of migrating from Jira to Azure DevOps (formerly VSTS) or Team Foundation Server (TFS).
It is an interesting challenge that require both domain and technical skills as discussed in the article. On the domain side we need to understand how to map the way planning and development works in Jira and how that will work in Azure DevOps. On the technical side we need to figure out how map fields, state, users, history and so on. Most likely you will end up using REST api:s or SDKs, spending hours to understand the protocols, debugging code and adding little value to your users.
So how can we make this process suck less? Enter the Jira to Azure DevOps work item migration tool! In this post, me and co-author Mathias Olausson will try to explain in detail how to best utilize the tool.
Jira to Azure DevOps migration tool
Having worked with migrating, consolidating and synchronizing development team data for many years, we at Solidify have built a bunch of internal tools. Even if it’s not a very complicated problem it will take time to write a tool and most likely it will not be ideal the first time you do it.
Since we believe it should be easy to move between development platforms, we decided to open source the tool we have developed for work item migration between Jira and Azure DevOps/TFS. Of course, we hope the community will help improve the tools as well to make them valuable and relevant in other scenarios than what we have used it for in the past.
The Jira to Azure DevOps migration process is done in two phases: First, data is exported from Jira to text files. This can be done in batches until the right set of items are ready for import. Second, importing the data files to work items in Azure DevOps/TFS.
The key capabilities of the tool include: - Jira items are exported based on JQL queries. - Users can be translated during migration in order to maintain proper history. - Field mapping is provided to map fields from the source to target account based on configuration. - State mapping between Jira and Azure DevOps states. - History from Jira is maintained. - Migration of links and attachments. - Dates such as created or changed date are maintained. - Area/Iteration paths can be defaulted to a specific value when they don't exist in the target project.
Migrating from Jira to Azure DevOps or TFS
Now that we have a tool, let’s look at how we can use it.
Note: make sure to check out the latest version of the migrating guide here.
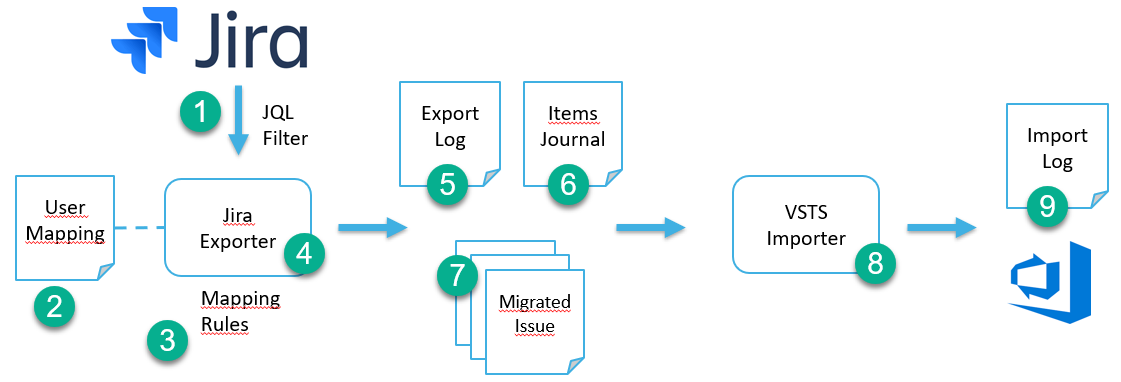
Fig 1. Jira to Azure DevOps migration process
A practical example
We´ll now go through a practical example of how do migrate from Jira to Azure DevOps, complete with screenshots, configuration setup and the output from the export and finally see how the project looks in Azure DevOps. We start with an out of the box Scrum project in Jira. Note that this is a demo project, but it could just as well be a real Scrum project from your own company. A screenshot from Jira looks like this:
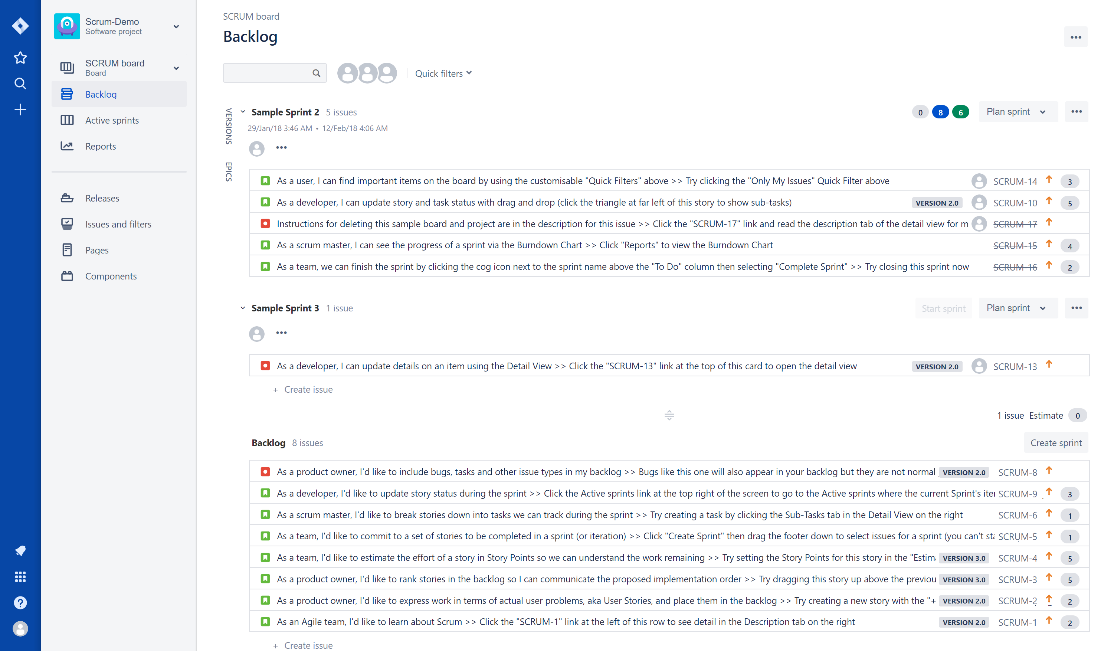
Fig 2. Demo Scrum project in Jira
Part one: setting the configuration
To begin the migration, you first need to head over to GitHub and grab the latest release of the tool: [https://github.com/solidify/jira-azuredevops-migrator/releases] (https://github.com/solidify/jira-azuredevops-migrator/releases).
Download the file called jira-azuredevops-migrator-<version>.zip and unzip it. This is a compiled version ready to go.
Since we want to migrate our Jira demo project to a Scrum template in Azure DevOps, we're going to use the sample configuration file that is based on the Scrum template in Azure DevOps. The sample configuration file is placed in the folder Samples and it's called config-scrum.json. The complete documentation of every field is available here.
Here is how it looks out of the box:
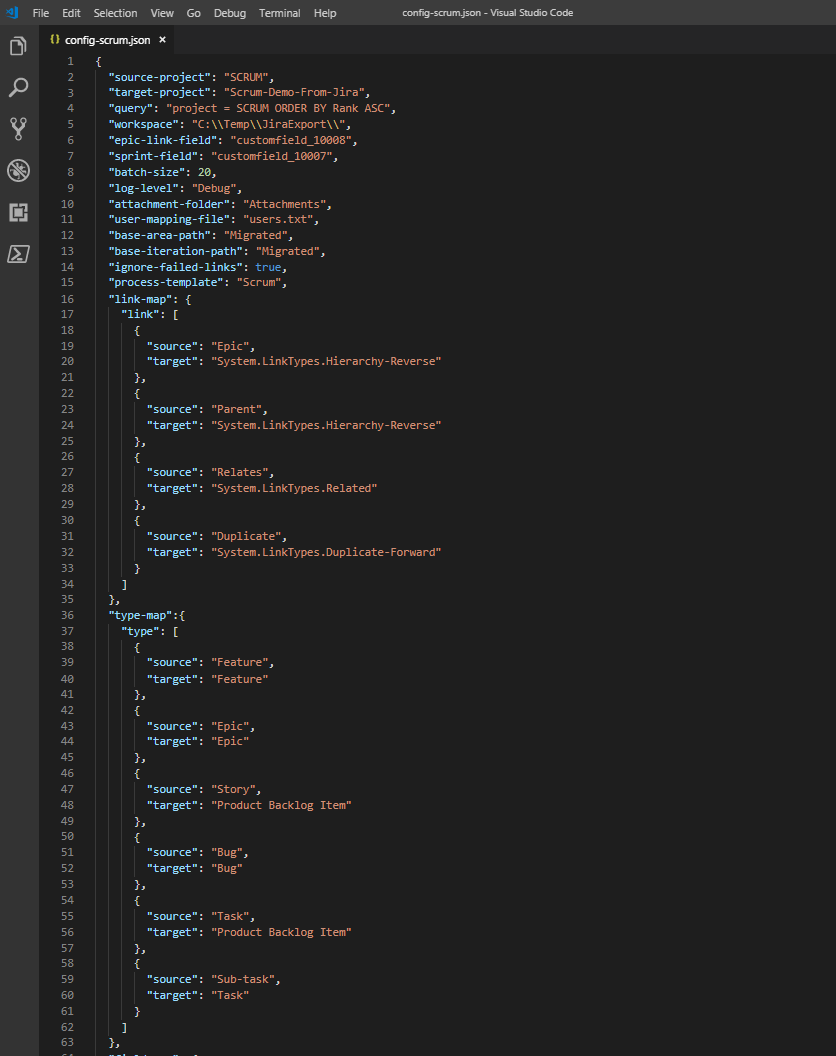
Fig 3. Sample configuration
This default configuration says that we’re going to export all items in the Jira project with short name "SCRUM" and migrate them to an Azure DevOps project called "Scrum-Demo-From-Jira".
The query we´re using to select all could instead be project = SCRUM AND issue type in (Story, Sub-task) ORDER BY Rank ASC, if you for example only want to export User stories and Sub tasks. The workspace where the exported Jira items in the form of json files are going to end up in C:\Temp\JiraExport and the Area Path and Iteration path in Azure DevOps are both set to "Migrated”, so we can easily distinguish the migrated items and move them elsewhere.
The configuration has also mapped standard Jira items to their respective Azure DevOps work item types based on the Scrum template from Microsoft, so it will look like this:
- Feature = Feature
- Epic = Epic
- Story = Product Backlog Item
- Bug = Bug
- Task = Product Backlog Item
- Sub-task = Task
The standard Jira fields are mapped to the standard Azure DevOps fields as well.
As you can see in the configuration file, the work item type State in Azure DevOps has been defined 3 times and that is because we need to set different states on the work item depending if it’s a Task, Bug, Product Backlog Item, Epic or Feature. You can read more in detail about the different states in the different templates in Azure DevOps here.
For any work item we export that is of type Task we're mapping states like this:
- To Do = To Do
- Done = Done
- In Progress = In Progress
For any work items we export that is of type Bug or Product Backlog Item we´re mapping states like this:
- To Do = New
- Done = Done
- In Progress = Committed
For any work item we export that is of type Epic and Feature we're mapping states like this:
- To Do = New
- Done = Done
- In Progress = In Progress
The Scrum template is the one that differs depending on work item type. Agile and CMMI templates are more straightforward when it comes to states for work item types.
In order to migrate users and assign the new work items in Azure DevOps to the same user as the original task had in Jira, we need to add a text file in the root that would look something like this:
Some.JiraUser@domain.com=Some.AzureDevOpsUser@domain.com
To customize this sample for your project you need to change "source-project" and "target-project", but you might also want to change where exported items end up ("workspace") as well as Area Path and Iteration Path ("base-area-path" and "base-iteration-path") before you run the export.
When the configuration file has been updated to match your Jira and Azure DevOps projects and the query has been updated to match your needs and project names, it's time to start the actual export from Jira.
Part two: Export from Jira
- Open a cli of your choice and navigate to where the extracted zip file exists. In my case I'll open a Command Prompt and write:
cd C:\Temp\jira-azuredevops-migrator-2.0.2 - Make sure your updated
config-scrum.jsonandusers.txtare in the root - Collect the access keys you need for Jira:
- Identify the migration account (username and password) to access Jira
- Get the URL to Jira and the name of the source project
- Run the export tool by typing the following command:
jira-export -u jiraaccount@some.domain -p xxxxxxx --url https://my.jira.url --config config-scrum.json --force
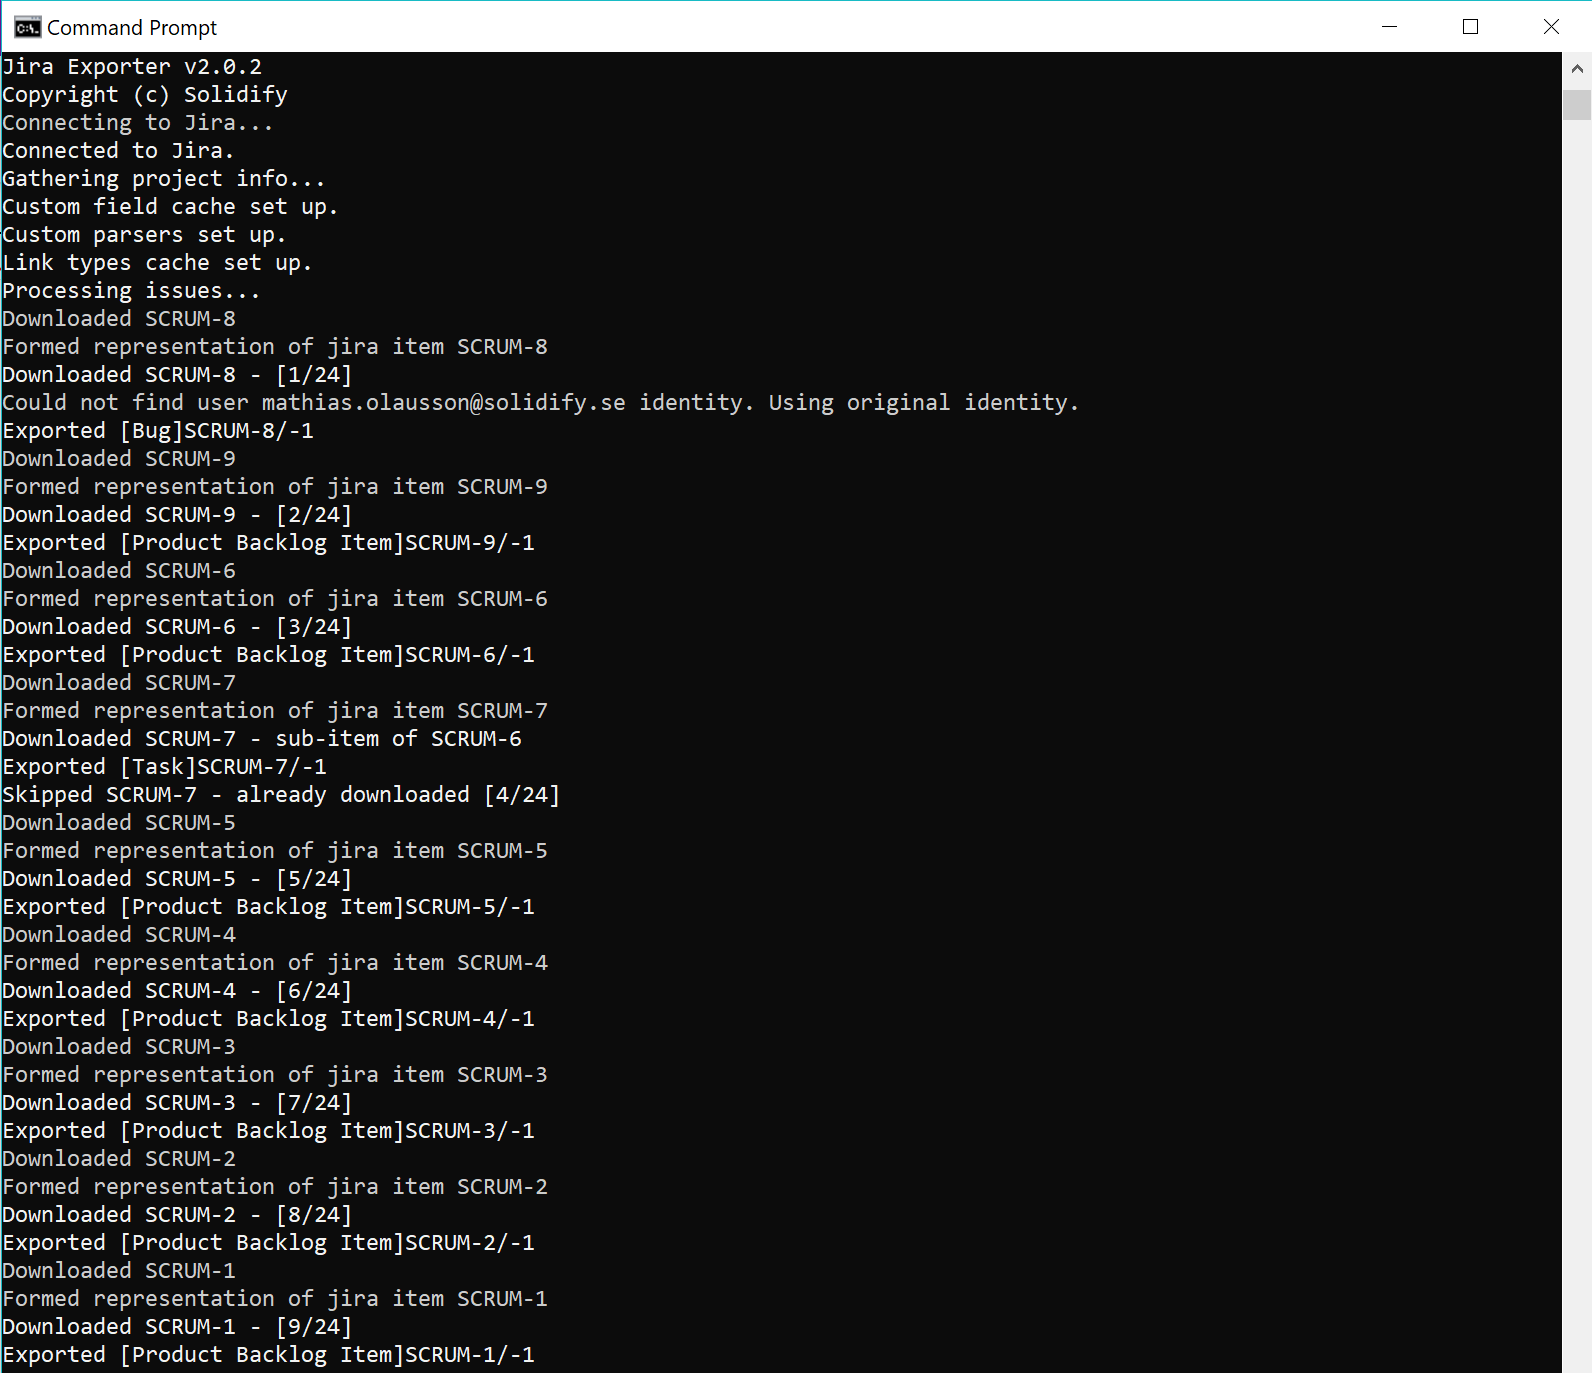 Fig 4. Exporting from Jira
- Review the export logfile (created for reference and troubleshooting)
- Done. The exported items are now in the workspace folder specified in the configuration and it looks like this:
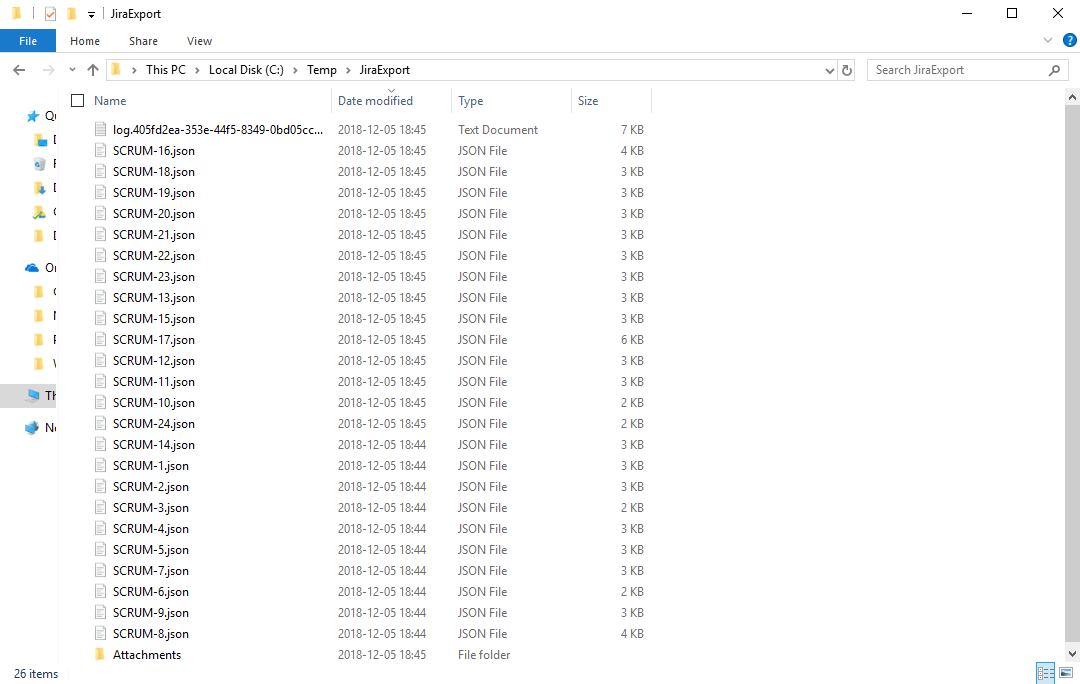 Fig 5. The exported Jira catalogue
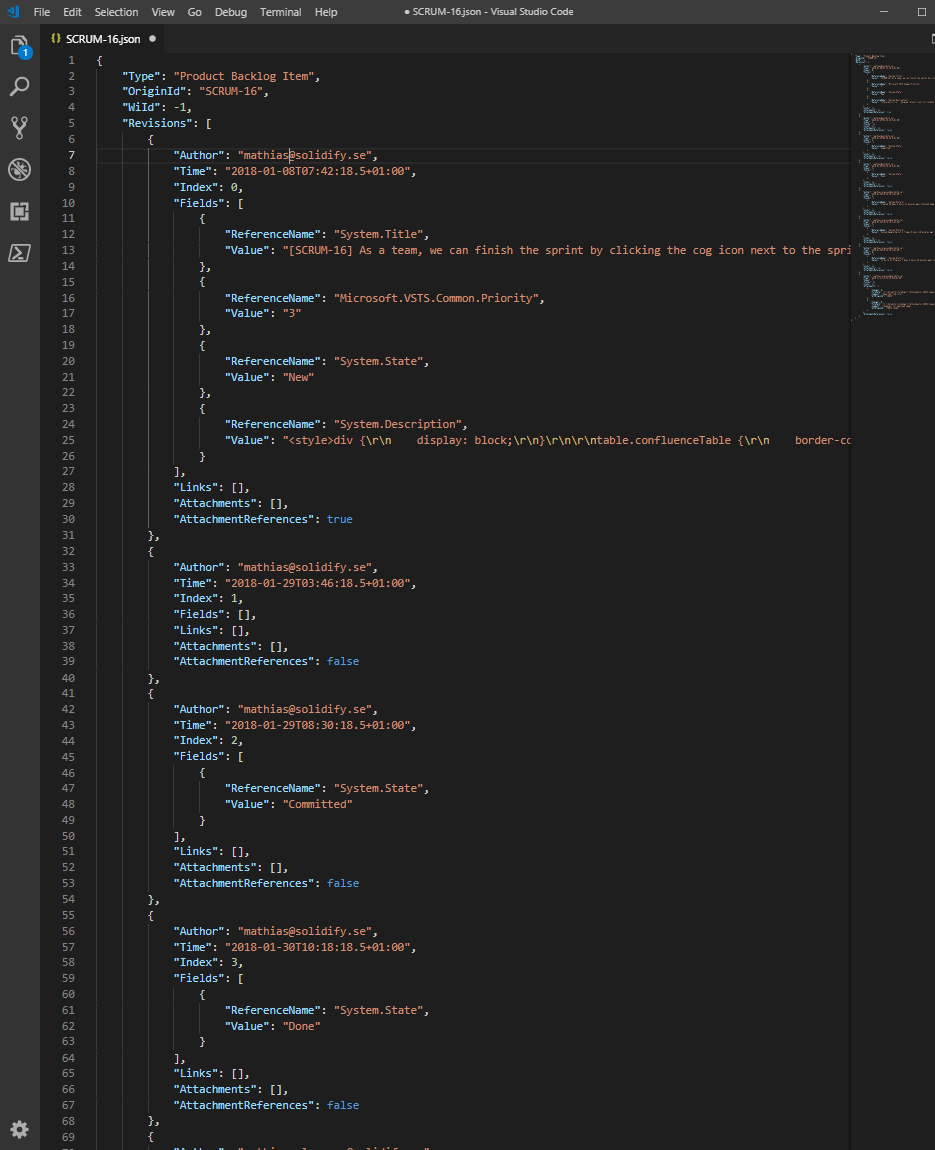 Fig 6. Exported json file
Part three: Import to Azure DevOps
Now we're ready to import the items to Azure DevOps.
-
Collect the access keys you need for Azure DevOps:
- Get the URL and name of the target Azure DevOps organization
- Acquire a personal access token for the organization here with at least work item read/write permissions
- Get the name of the target project (the import tool will create the target project if it does not already exist)
-
Run the import tool by typing the following command:
wi-import --token myAccessToken --url https://my.azuredevops.url --config config-scrum.json --force
Fig 7. Importing to Azure DevOps
- Done. The imported items are now visible in your Azure DevOps project.
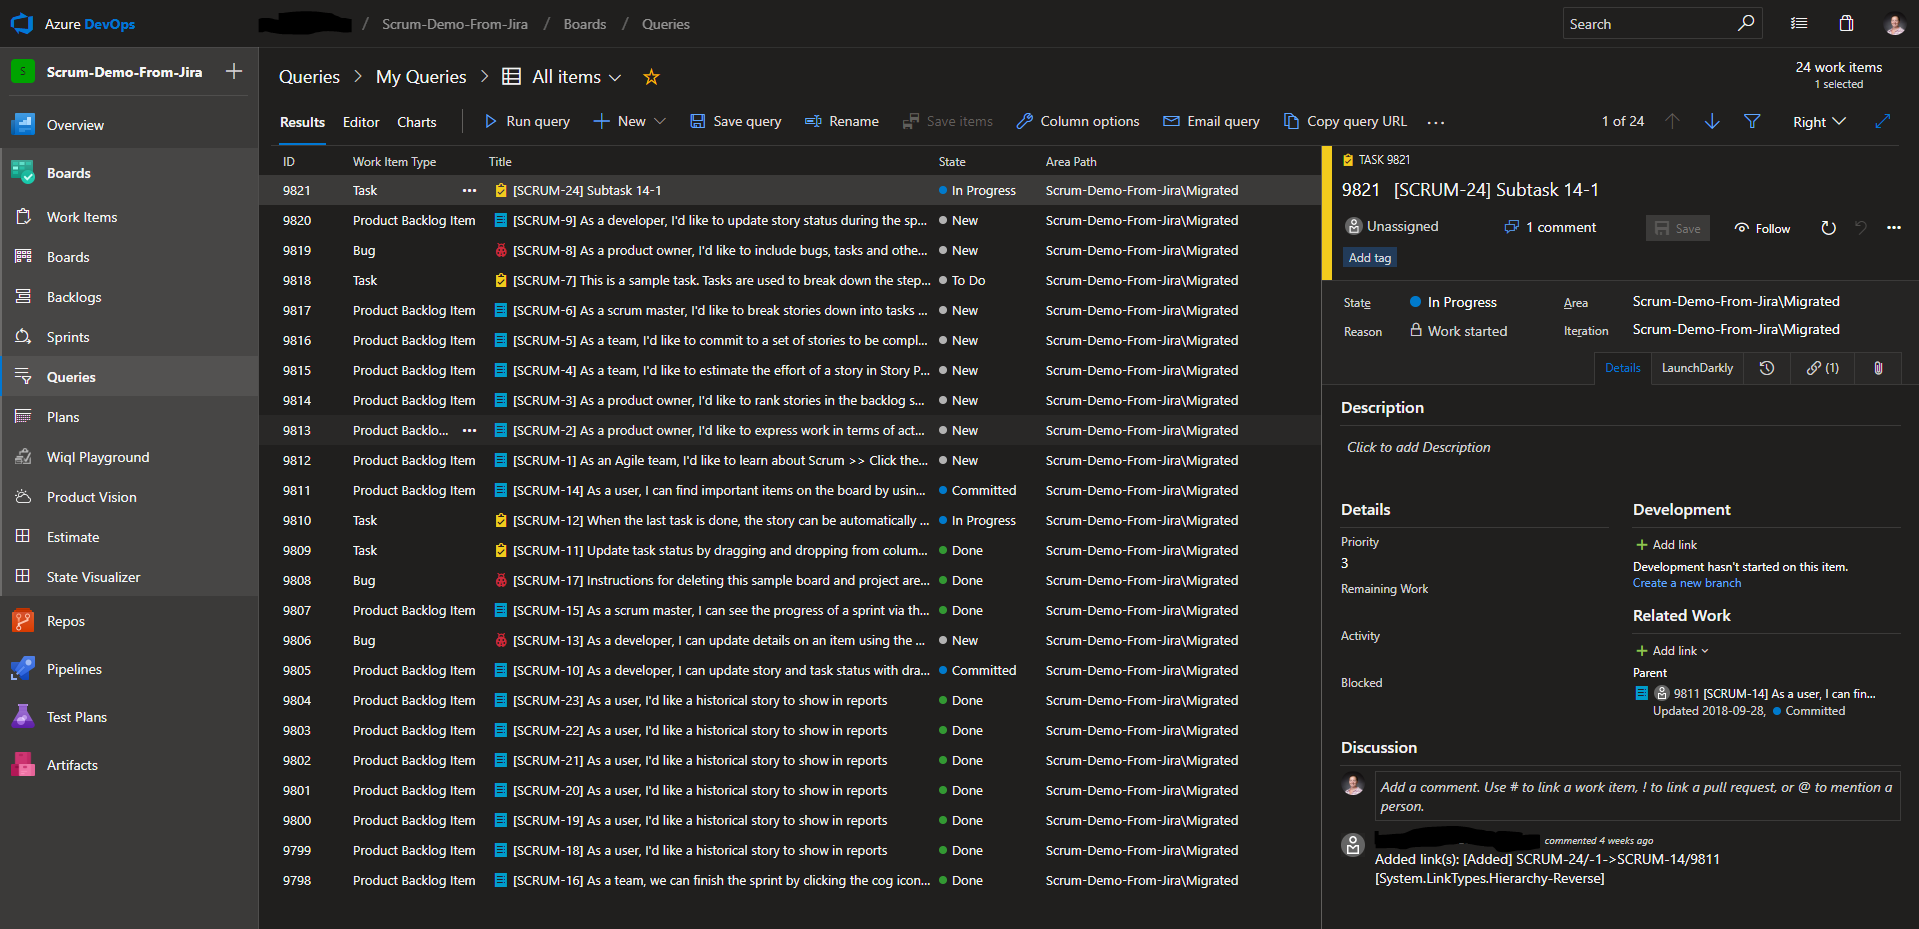 Fig 8. Imported Azure DevOps project
If you have problems with the tool or see the need for additional capabilities just fork the code, improve it and send us a pull-request. You can of course also post an issue if you’re not sure where to start.
Resources
Below is a list of resources to help you get started with your first Java to Azure DevOps migrations:
- Jira to Azure DevOps migration tool: https://github.com/solidify/jira-azuredevops-migrator
- Latest release: https://github.com/solidify/jira-azuredevops-migrator/releases
- Jira to VSTS migration – migrating work items: https://solidify.dev/jira-to-vsts-migration-work-items https://solidify.dev/jira-to-vsts-migration-work-items
Summary
Once you understand the requirements of migrating from Jira to Azure DevOps, the process can be quite straight forward when using a migration tool.
The tools are provided as-is but will require detailed understanding of how to migrate work items between different systems in order to do a successful migration. In this article we showed how to migrate between Jira and Azure DevOps. If you need support or help with any kind of work item migrations, feel free to contact the team at Solidify for expert consulting by leaving a comment below or reaching out to mailto:info@solidify.se.